
Introduction to React Testing Library
Marcin Bartoś
April 26, 2021
In the ever-changing landscape of javascript libraries, it’s oftentimes hard to pick the right tool for the job. For quite a while that wasn’t the case for testing React components. Enzyme has established itself as a go-to tool for testing React code.
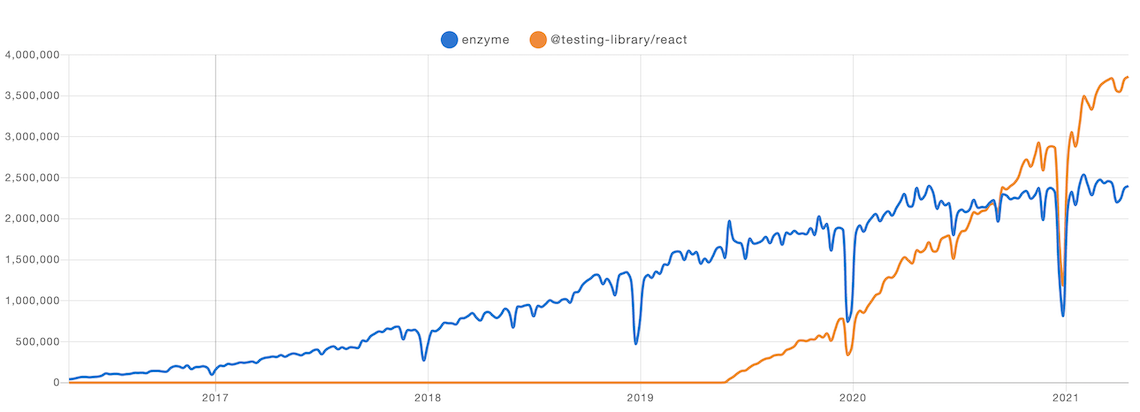
This has changed with the release of React-testing-library. It quickly started to gain some traction and finally surpassed enzyme in number of downloads in 2020
Different approach to testing
Let’s face it – the tools we use affect how we write the code. The same can be said about testing. When using enzyme’s mount and shallow rendering it’s pretty common to look for some component instance in the rendered tree. Later you can make assertions for props, invoke the callback prop to test the event handling logic, etc. Such test case could look like this:
  it('passes all users to the UsersList', () => {
    const app = mount(<App />);
    expect(app.find('UsersList').prop('users')).toEqual(['Mike', 'Bob', 'Alex']);
  });
The problem with this approach is that it’s not resilient to changes. As the project grows and you add new features you’ll probably see the need for refactoring. You might want to change the shape of props or extract some code to a new component. It can be frustrating when changes like this cause your tests to fail. After all, refactoring is the natural part of software development. Your tests should help you with that, not discourage you from improving code quality.
React Testing Library takes a different approach. Things like components, props, and state are considered implementation details. There are no APIs to query the component tree or inspect component instances. The only thing that matters is how the rendered DOM looks like. This API design forces us to write tests that resemble the user interaction with the website. After all, the end-users have no idea how the code is structured. They interact with your application via DOM rendered by a browser.
Testing async code
Testing async code in enzyme has always been a bit tricky. The library itself doesn’t provide any utilities for that. There are multiple techniques for waiting until asynchronous code is executed, but all of them feel like a workaround rather than a solution.
// Simulate network request
const fetchTodos = () => Promise.resolve(["write some code", "write some tests"]);

export const ToDo = () => {
  const [todos, setTodos] = useState([]);
  const [loading, setLoading] = useState(false);

  useEffect(() => {
    setLoading(true);
    fetchTodos()
      .then(setTodos)
      .then(() => setLoading(false));
  }, []);

  return loading
    ? <div class='spinner' role='progressbar' />
    : (
      <ul>
        {todos.map(todo => (
          <li key={todo}>{todo}</li>
        ))}
      </ul>
    )
};

  it('should render list of todos when data is fetched from API', done => {
    const todo = mount(<ToDo />);

    // Assuming all promises are resolved immediately we can use setImmediate
    // to wait with assertions until microtask queue is empty.
    setImmediate(() => {
      todo.update();
      const items = todo.find('li').map(li => li.text());
      expect(items).toEqual(['write some code', 'write some tests']);
      done();
    });
  });

  it('should hide the spinner when data is fetched from API', done => {
    const todo = mount(<ToDo />);

    setImmediate(() => {
      todo.update();
      const spinner = todo.find('[role="progressbar"]');
      expect(spinner.exists()).toBe(false);
      done();
    });
  });
With RTL testing async code is a breeze. It provides a set of simple, yet powerful methods useful when we want to wait for something to happen. Probably the most commonly used tool is a set of findBy* queries. They are perfect when we need to wait for an element to eventually appear in the DOM.
  it("should render list of todos when data is fetched from API", async () => {
    render(<ToDo />);

    // findBy* queries return a promise which is resolved only when elements can be found in DOM.
    // This makes it really easy to wait for elements to appear before making assertions.
    const todos = await screen.findAllByRole("listitem");
    const items = todos.map((li) => li.textContent);
    expect(items).toEqual(['write some code', 'write some tests']);
  });
Whenever we need to wait until some element disappears we can use waitForElementToBeRemoved function
  it('should hide the spinner when data is fetched from API', async () => {
    render(<ToDo />);

    const spinner = screen.getByRole('progressbar');
    await waitForElementToBeRemoved(spinner);
  });
Both findBy* and waitForElementToBeRemoved are perfect tools when we want to wait for some change in the DOM structure. However not all async code needs to modify the DOM. A good example might be reporting code – we might want to send a call to the analytics service, but we don’t need to give the user any feedback afterward. RTL provides additional waitFor function. It accepts a callback and tries to execute it in an interval until it stops throwing an error or timeout is reached.
  // waitFor function returns a promise which is resolved when callback stops throwing an error
  // or rejected when timeout is reached
  await waitFor(() => expect(mockReportingAPI).toHaveBeenCalledTimes(1), { timeout: 2000 })
Simulating browser events
Although Enzyme provides simulate() method useful for testing event handlers, it doesn’t fire any events. It simply passes SyntheticEvent to the proper callback prop in your code. In many cases that’s not a problem, however, there are some caveats we need to keep in mind when writing tests.
Single user interaction with the website might result in multiple DOM events. For example, clicking on a text input label in the browser automatically places focus on the input. This means that aside from click event we can expect focus change event as well. To get the same behavior in enzyme we’ll need to simulate these events manually. Otherwise, our code in tests might behave differently than the code running in a browser.
RTL paired with @testing-library/user-event package hides all of that complexity from developers. It provides a set of functions that simulate user interaction with the website. It makes testing our event handling much easier and gives us more confidence that our tests check the actual user experience.
Conclusion
Enzymejs is a great library that has enabled React community to create well-tested components over the years. It’s not opinionated and provides relatively low-level functions for inspecting and interacting with a component tree. It’s up to developers to choose how they use it.
On the other hand, React Testing Library is intentionally designed to guide users to avoid testing implementation details. It’s easy to use and encourages tests that use components in a way they are intended to be used. It means we can spend more time thinking about what to test, rather than how to test. I highly recommend giving it a try.


